近期工作在将前端架构webpack升级到5时,一些配套模块也需要进行升级,其中包括了css处理模块postcss,旧版本使用的是postcss7,在升级至postcss8的过程中发现部分插件前置依赖还是停留在7版本,且年久失修,在postcss8中出现各种各样的问题,无奈只能研究源码将目前部分旧版本插件升级至新版本,这里将升级插件的过程进行简化和提炼,让读者自己也可以编写一个postcss8插件。
插件工作原理
PostCSS是一个允许使用 JS 插件转换样式的工具。开发者可以根据自己的实际需求,在编译过程将指定css样式进行转换和处理。目前PostCSS官方收录插件有200多款,其中包括使用最广泛的Autoprefixer自动补全css前缀插件。
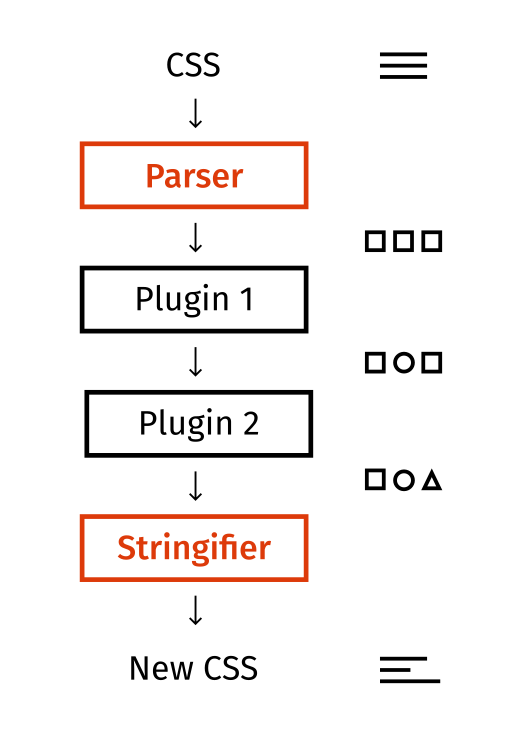
PostCSS和插件的工作原理其实很简单,就是先将css源码转换为AST,插件基于转换后AST的信息进行个性化处理,最后PostCSS再将处理后的AST信息转换为css源码,完成css样式转换,其流程可以归结为下图:
下面我们通过实际例子看看PostCSS会将css源码转换成的AST格式:
const postcss = require('postcss')
postcss().process(`
.demo {
  font-size: 14px; /*this is a comment*/
}
`).then(result => {
  console.log(result)
})
代码中直接引用postcss,在不经过任何插件的情况下将css源码进行转换,AST转换结果如下:
{
  "processor": {
    "version": "8.3.6",
    "plugins": []
  },
  "messages": [],
  "root": {
    "raws": {
      "semicolon": false,
      "after": "\n"
    },
    "type": "root",
    // ↓ nodes字段内容重点关注
    "nodes": [
      {
        "raws": {
          "before": "\n",
          "between": " ",
          "semicolon": true,
          "after": "\n"
        },
        "type": "rule",
        "nodes": [
          {
            "raws": {
              "before": "\n  ",
              "between": ": "
            },
            "type": "decl",
            "source": {
              "inputId": 0,
              "start": {
                "offset": 11,
                "line": 3,
                "column": 3
              },
              "end": {
                "offset": 26,
                "line": 3,
                "column": 18
              }
            },
            "prop": "font-size", // css属性和值
            "value": "14px"
          },
          {
            "raws": {
              "before": " ",
              "left": "",
              "right": ""
            },
            "type": "comment", // 注释类
            "source": {
              "inputId": 0,
              "start": {
                "offset": 28,
                "line": 3,
                "column": 20
              },
              "end": {
                "offset": 48,
                "line": 3,
                "column": 40
              }
            },
            "text": "this is a comment"
          }
        ],
        "source": {
          "inputId": 0,
          "start": {
            "offset": 1,
            "line": 2,
            "column": 1
          },
          "end": {
            "offset": 28,
            "line": 4,
            "column": 1
          }
        },
        "selector": ".demo", // 类名
        "lastEach": 1,
        "indexes": {}
      }
    ],
    "source": {
      "inputId": 0,
      "start": {
        "offset": 0,
        "line": 1,
        "column": 1
      }
    },
    "lastEach": 1,
    "indexes": {},
    "inputs": [
      {
        "hasBOM": false,
        "css": "\n.demo {\n  font-size: 14px;\n}\n",
        "id": "<input css vi1Oew>"
      }
    ]
  },
  "opts": {},
  "css": "\n.demo {\n  font-size: 14px;\n}\n"
}
AST对象中nodes字段里的内容尤为重要,其中存储了css源码的关键字、注释、源码的起始、结束位置以及css的属性和属性值,类名使用selector存储,每个类下又存储一个nodes数组,该数组下存放的就是该类的属性(prop)和属性值(value)。那么js插件就可以基于这个nodes字段对css属性进行修改,就可以实现css的转换。
PostCSS插件格式规范及API
PostCSS插件其实就是一个JS对象,其基本形式和解析如下:
module.exports = (opts = { }) => {
  // 此处可对插件配置opts进行处理
  return {
    postcssPlugin: 'postcss-test', // 插件名字,以postcss-开头

    Once (root, postcss) {
      // 此处root即为转换后的AST,此方法转换一次css将调用一次
    },

    Declaration (decl, postcss) {
      // postcss遍历css样式时调用,在这里可以快速获得type为decl的节点(请参考第二节的AST对象)
    },

    Declaration: {
      color(decl, postcss) {
        // 可以进一步获得decl节点指定的属性值,这里是获得属性为color的值
      }
    },

    Comment (comment, postcss) {
        // 可以快速访问AST注释节点(type为comment)
    },

    AtRule(atRule, postcss) {
        // 可以快速访问css如@media,@import等@定义的节点(type为atRule)
    }

  }
}
module.exports.postcss = true
更多的PostCSS插件API可以详细参考官方postcss8文档,基本原理就是PostCSS会遍历每一个css样式属性值、注释等节点,之后开发者就可以针对个性需求对节点进行处理即可。
实际开发一个postcss8插件
了解了PostCSS插件的格式和API,我们将根据实际需求来开发一个简易的插件,有如下css:
.demo {
  font-size: 14px; /*this is a comment*/
  color: #ffffff;
}
需求如下:
- 删除css内注释
- 将所有颜色为十六进制的
#ffffff转为css内置的颜色变量white
根据第三节的插件格式,本次开发只需使用Comment和Declaration接口即可:
// plugin.js
module.exports = (opts = { }) => {

  return {
    postcssPlugin: 'postcss-test',

    Declaration (decl, postcss) {
        if (decl.value === '#ffffff') {
            decl.value = 'white'
        }
    },

    Comment(comment) {
      comment.text = ''
    }

  }
}
module.exports.postcss = true
在PostCss中使用该插件:
// index.js
const plugin = require('./plugin.js')

postcss([plugin]).process(`
.demo {
  font-size: 14px; /*this is a comment*/
  color: #ffffff;
}
`).then(result => {
  console.log(result.css)
})
运行结果如下:
.demo {
  font-size: 14px; /**/
  color: white;
}
可以看到,字体颜色值已经成功做了转换,注释内容已经删掉,但注释标识符还依旧存在,这是因为注释节点是包含/**/内容存在的,只要AST里注释节点还存在,最后PostCss还原AST时还是会把这段内容还原,要做到彻底删掉注释,需要对AST的nodes字段进行遍历,将type为comment的节点进行删除,插件源码修改如下:
// plugin.js
module.exports = (opts = { }) => {

  // Work with options here
  // https://postcss.org/api/#plugin

  return {
    postcssPlugin: 'postcss-test',

    Once (root, postcss) {
      // Transform CSS AST here
      root.nodes.forEach(node => {
        if (node.type === 'rule') {
          node.nodes.forEach((n, i) => {
            if (n.type === 'comment') {
              node.nodes.splice(i, 1)
            }
          })
        }
      })
    },


    Declaration (decl, postcss) {
      // The faster way to find Declaration node
      if (decl.value === '#ffffff') {
        decl.value = 'white'
      }
    }

  }
}
module.exports.postcss = true
重新执行PostCss,结果如下,符合预期。
.demo {
  font-size: 14px;
  color: white;
}
插件开发注意事项
通过实操开发可以看到开发一个PostCss插件其实很简单,但在实际的插件开发中,开发者需要注意以下事项:
1.尽量使插件简单,使用者可以到手即用
Build code that is short, simple, clear, and modular.
尽量使你的插件和使用者代码解耦,开放有限的API,同时开发者在使用你的插件时从名字就可以知道插件的功能。这里推荐一个简单而优雅的PostCss插件postcss-focus,读者可以从这个插件的源码中体会这个设计理念。
2.开发插件前确认是否有现成的轮子
如果你对自己的项目有个新点子,想自己开发一个插件去实现,在开始写代码前,可以先到PostCss官方注册的插件列表中查看是否有符合自己需求的插件,避免重复造轮子。不过截止目前(2021.8),大部分插件依旧停留在PostCss8以下,虽然PostCss8已经对旧版本插件做了处理,但在AST的解析处理上还是有差异,从实际使用过程中我就发现PostCss8使用低版本插件会导致AST内的source map丢失,因此目前而言完全兼容PostCss8的插件还需各位开发者去升级。
从低版本PostCSS迁移
升级你的PostCss插件具体可以参考官方给出的升级指引。这里只对部分关键部分做下解释:
1.升级API
- 将旧版
module.exports = postcss.plugin(name, creator)替换为module.exports = creator; - 新版插件将直接返回一个对象,对象内包含
Once方法回调; - 将原插件逻辑代码转移至
Once方法内; - 插件源码最后加上
module.exports.postcss = true;
具体示例如下:
旧版插件:
- module.exports = postcss.plugin('postcss-dark-theme-class', (opts = {}) => {
-   checkOpts(opts)
-   return (root, result) => {
      root.walkAtRules(atrule => { … })
-   }
- })
升级后插件:
+ module.exports = (opts = {}) => {
+   checkOpts(opts)
+   return {
+     postcssPlugin: 'postcss-dark-theme-class',
+     Once (root, { result }) {
        root.walkAtRules(atrule => { … })
+     }
+   }
+ }
+ module.exports.postcss = true
2.提取逻辑代码至新版API
把逻辑代码都放在Once回调内还不够优雅,PostCss8已经实现了单个css的代码扫描,提供了Declaration(), Rule(), AtRule(), Comment() 等方法,旧版插件类似root.walkAtRules的方法就可以分别进行重构,插件效率也会得到提升:
  module.exports = {
    postcssPlugin: 'postcss-dark-theme-class',
-   Once (root) {
-     root.walkAtRules(atRule => {
-       // Slow
-     })
-   }
+   AtRule (atRule) {
+     // Faster
+   }
  }
  module.exports.postcss = true
总结
本文对PostCss8插件进行一个简单总结,通过本文的介绍读者可以快速开发一个PostCss8插件,并在最后引用官方示例介绍了如何快速升级旧版PostCss插件,目前还有大量还没进行升级兼容的PostCss插件,希望读者可以在阅读本文后可以获得启发,对PostCss8的插件生态做出贡献。
(完)